Metanorma tutorial (complete)
Introduction to Metanorma
Before we dive into using the Metanorma toolchain, let’s cover the basic ideas you need to understand to work with Metanorma. In this lesson we will cover:
-
What Metanorma is
-
The differences between Word and Metanorma
-
The paradigms "What you see is what you get" vs. "What you see is what you mean"
-
What the Metanorma workflow looks like from document creation to publication
>> Start next lesson
What is Metanorma?
What you get is what you see vs. What you get is what you mean
Word is probably your go-to application for casual writing, such as letters, invitations - and with good reason, because Word has many benefits, such as:
-
Creating Documents quickly
-
An intuitive interface
-
Printer prints exactly what you see on your screen = What you see is what you get (WYSIWYG)
However, have you ever written a longer text, with many references, like a scientific text? Then you might have experienced some pain with Word: It tends to mess up the formatting, even if you use templates. Reference management in Word is also no fun, but the worst: Word tends to crash for very long documents, like standards.
Because of these issues, another approach to creating documents is popular: "What you see is what you mean" (WYSIWYM). This concept differs from WYSIWYG because you separate the content and the layout into separate files. To tell the compiler how the text should look or behave, you use markup language. You may have heard about Markdown or LaTeX, which are popular markup languages, but Metanorma uses AsciiDoc.
The benefit is that you can publish different outputs from one source, for example into PDF or HTML. Since the layout is stored in a separate file, each output can even be styled differently.

What is Metanorma?
Metanorma is three things in one:
- Software
-
The Metanorma toolchain is the software that you use to create documents and generate output.
- Document metamodels
-
Metanorma provides a document structure for standardization documents, specified in ISO 36001. Since each organization has different requirements for their standard documents, they use a "flavor" of Metanorma. A flavor is a document model that provides additional metadata to reflect the SDO’s needs.
- XML schemas
-
To use the defined document metamodels, there needs to be a machine-readable file so that documents can be checked against their intended structure.
Metanorma consists of several layers of complexity, see the figure below.
The basis for each metanorma document is AsciiDoc. Since AsciiDoc itself has limited functionalities for authoring standards, Metanorma extends AsciiDoc as one part of the Metanorma toolchain (1). Metanorma AsciiDoc provides advanced features, such as automatically linking the correct standard in a bibliography section.
The final layer of complexity are flavour-specific document rules and best practices based on the document metamodels (2). For example, ISO documents must include a "Scope" section, whereas NIST requires an "Acknowledgements" section.

Metanorma has many advantages for authoring standards:
-
Metanorma supports the needs of many standardization organizations, such as ISO, IETF, and many more.
-
Metanorma can be extended with new document models (flavors).
-
It uses the "what you see is what you mean" (WYSIWYM) approach based on AsciiDoc.
-
You can style your content differently, depending on the output.
-
The document models ensure complete and consistent standard documents that follow the rules of your organization.
-
Metanorma can create long and complex documents without them becoming corrupted.
-
Metanorma enables dynamic integration of external data into documents.
Let’s explore the workflow of Metanorma in the next lesson.
>> Start next lesson
The Metanorma Workflow
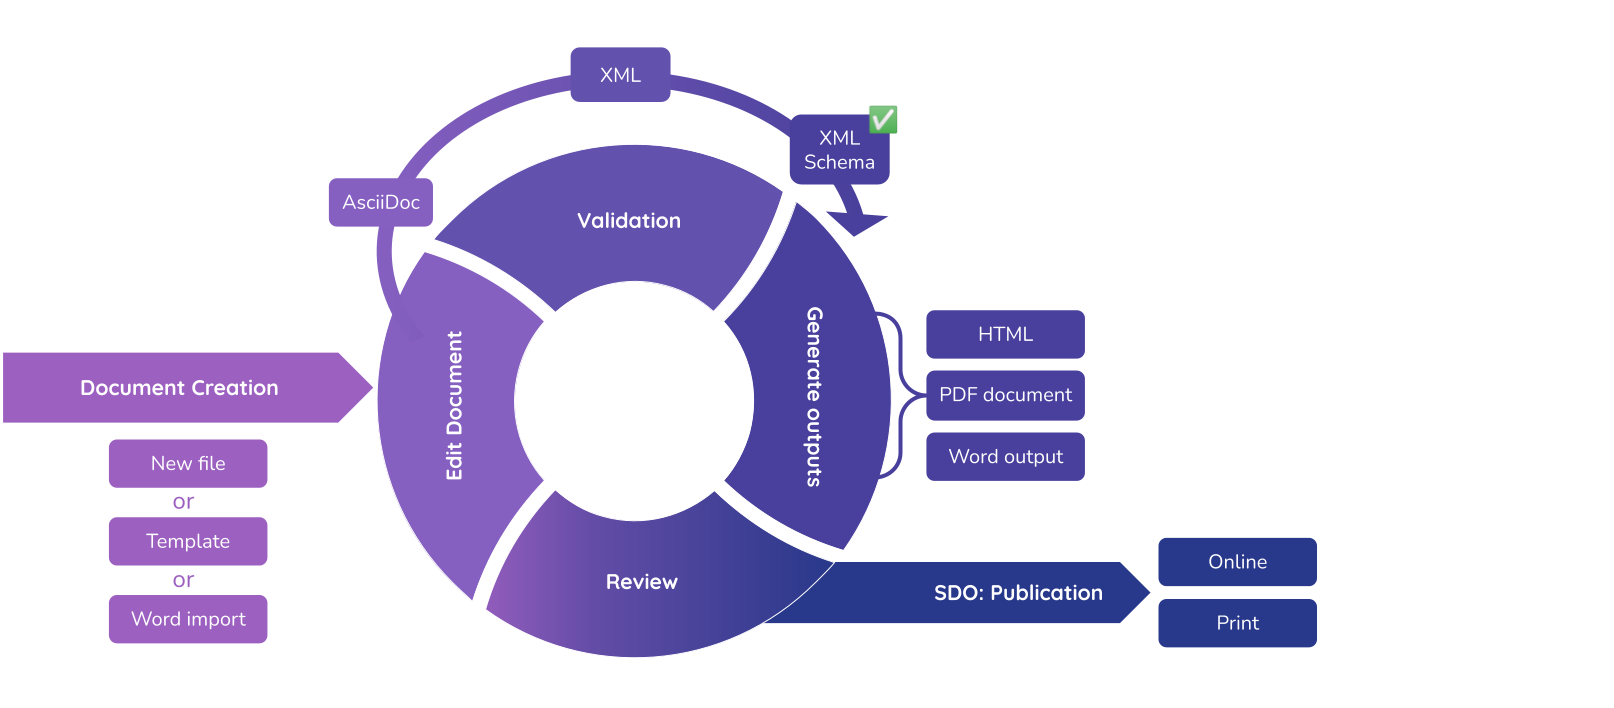
The Metanorma workflow consists of six phases:
-
Document creation
-
Editing the document
-
Validation
-
Output generation
-
Review
-
Publication
Document creation
You can create a new standard document either by:
-
Creating a new, empty AsciiDoc file
-
Using a template
-
Importing a Word Document
New file
The easiest way is to create a document from scratch, by creating an empty AsciiDoc file (.adoc) in the desired folder.
Templates
Templates get you started faster, as they provide the structure of a standard document already. If your organization provides templates, you can create a new document based on a template using the command line.
Import from Word
Importing from Word makes sense if you are moving from Word to Metanorma and need to move several, large documents. To facilitate the migration, you can use the import tool called Reverse AsciiDoc. However, the imports are not always perfect, so you need to be familiar with the Metanorma and know how to resolve error messages. If you new to Metanorma, the simplest way is to transfer your content into Metanorma AsciiDoc manually.
Editing the document
You can edit Metanorma documents in any plain-text editor because they only consist of text. The next lesson will introduce you to the basics of AsciiDoc. These editors have been reported to work well for writing Metanorma AsciiDoc:
-
Atom with Asciidoctor plugins
-
Microsoft Visual Studio Code with AsciiDoc extension for live preview
Validation
Before you can generate any output, the Metanorma document needs to be checked against the document model to ensure it follows the rules of your SDO.
Since the document model is defined in an XML schema, the compiler converts the Metanorma document into a Metanorma XML file. This XML file is then checked against the SDO’s XML schema. Metanorma will log all deviations from the SDO’s structure or formatting on the terminal and into an error file.
- ❌ Invalid XML
-
The XML file does not comply with the XML schema, or with the formatting rules defined by the SDO.
All errors are logged to the terminal and are saved to an error file (.
err.html). Often the document will render successful despite errors, but the error messages point out potential issues with the document structure. - ✅ Valid XML
-
The XML file complies with the XML schema and the compiler can proceed to generate an output.
Output generation
General
The Metanorma toolchain compiles documents in the following formats:
-
Metanorma XML
-
HTML
-
PDF
-
Microsoft Word
Metanorma XML
Metanorma always generates an XML output first because it is the intermediate
format used to drive the other formats. The Metanorma XML file marks up the
semantic content of the standards document and is therefore used during the
validation stage. Metanorma then generates a presentation version of the XML
(.presentation.xml), which resolves cross-references, captions, and
internationalization, and is used as the basis of all other formats.
HTML
The HTML output is in HTML 5. All HTML output has a sidebar with a Javascript-generated table of contents, which is two section levels deep. Audio and video files are not supported.
Metanorma generates PDF output from XML. The styling comes from an XSL-FO stylesheet. A processing engine (Apache FOP) interprets the stylesheet and generates the PDF.
Microsoft Word
Metanorma can also generate a .doc Word output. Metanorma does not output
.docx because it is easier to support all of the formatting requirements in a
.doc file.
Review
Standards documents require collaboration and every SDO has its own process for reviews. Metanorma does support authors and reviewers by providing metadata that indicate in which phase the document is in and who reviewed it. You can add your remarks to a document with comments or create a to-do if you want someone to act.
Publication
Once you and your reviewers agree that the standard is ready for publishing, you send it to your standard developing organization (SDO). The SDO will publish your document in their preferred channels, such as online or print.
For organizations using the Metanorma release pipeline, publishing is automated:
pushing to main triggers compilation and creates a GitHub Release with the
document files and metadata. See
Organization-Scale Publishing Setup
for details.
Before we dive into AsciiDoc, let’s summarize what we’ve covered so far.
>> Start next lesson
Summary
Let’s recap what we’ve learned so far:
-
Metanorma uses a what you see is what you mean (WYSIWYM) approach, meaning that the text you write is what you want to see.
-
You need to render documents to have a correct visible output. The appearance is controlled in a stylesheet.
-
Metanorma is an umbrella term for several things and consists of:
The Metanorma toolchain, document models and a XML schema of these document models. -
Metanorma documents use Metanorma AsciiDoc markup
-
When you want to generate an output, the AsciiDoc document is converted into XML in order to be checked against the XML schema.
-
If the document is valid, Metanorma generates an HTML, PDF and Microsoft Word (
.doc) output.
Now that we have covered the fundamentals, let’s have a look at AsciiDoc.
>> Start next lesson
Introduction to AsciiDoc
Before we write our first Metanorma document, let us look at the foundation for all Metanorma documents: AsciiDoc. In this lesson, we will discuss what AsciiDoc is and what a typical Metanorma document looks like. You will also learn how to write AsciiDoc.
Metanorma documents are written in AsciiDoc, a markup language that annotates text with processing instructions for layout.
Since AsciiDoc only consists of plain text, you can use any editor to create
AsciiDoc files (.adoc files).
AsciiDoc is very similar to Markdown or Wiki formatting but provides more precise markup for creating text documents, for example to create a bibliography section or an index.
Because Metanorma fulfills the markup requirements of SDOs, Metanorma extends plain AsciiDoc. This version of AsciiDoc is called Metanorma AsciiDoc.
An AsciiDoc document consists of different levels of granularity:
-
The document head (also called the header)
-
Sections
-
Blocks
-
Inline markup
We will have a look at these different levels of markup in the following lessons.
You can do the exercises either in the browser, or on your local machine. If you choose to use your local machine, you will need to install Metanorma and set up a new Metanorma project.
>> Start next lesson
The Header
Information about a document itself is called the "metadata" of the document. The document header is where metadata is entered. Metadata is specified by using document attributes.
Document attributes are used in the following ways:
-
provide semantic information for the document
-
modify visual appearance of output format
-
adjust the document generation process
You can specify metadata about:
-
Authors: Issuing organization, authors, and their location
-
Document information: Title, language, document stages (draft, published, etc.) copyright holder, etc.
-
Identifiers: Document numbers, ISBNs, URIs
-
Dates: Draft dates, revision dates, publishing date, copyright year, etc.
Some metadata influence how the document is generated and should only be used by advanced users. Often, they will require familiarity with the structures and processes of the flavor’s organization.
|
Note
|
Some of the metadata is visible in the document, such as :title:, while
others are not visible but still affect how your document is generated.
|
A document attribute looks like this:
:title: My document
:novalid:
Document attributes can be used as simple flags like on/off switches, which do not take a value, but typically accept one or more values.
|
Note
|
The order of document attributes generally does not matter to Metanorma, except that a document attribute with the same key can be overwritten by a subsequent definition of the same attribute below the original definition. |
= Rice model (1)
:docnumber: 17301 (2)
:doctype: international-standard (3)
:copyright-year: 2021
:language: en
:mn-document-class: iso (4)
:technical-committee: Food products (5)
:mn-output-extensions: xml,html,doc,html_alt (6)-
Document title
-
:docnumber:is the first document attribute, and it has the value 17301 -
:doctype:defines the type of document, for exampleinternational-standard,technical-report,guide, etc. The allowed values for this attribute are specific to each flavor. -
:mn-document-class:indicates the Metanorma flavor the document should be checked against. -
The committee responsible for the document.
-
mn-output-extensionsspecifies the generated output formats. It can take several comma-delimited values.
Now it’s your turn. Fill the document with the following attributes:
-
Document title
-
Your name
-
Your organization using the
:publisher:attribute -
Your organization’s address
-
The document class:
standoc -
The document type:
document -
The language
-
The copyright year
Hint
To declare an attribute, follow the syntax :attribute: value.
For example: :publisher: Ribose Inc.
Let’s add some sections to our document in the next lesson.
>> Start next lesson
Sections
Sections define hierarchy levels in a document, as chapters do.
In AsciiDoc, sections are encoded with titles prefixed by equal signs (=).
-
The document title is considered the highest section in the hierarchy, and is created by prepending a
=sign in front of the heading. -
Subsequent sections are encoded with titles prefixed with least two equal signs:
-
==indicates a first-level section; -
===indicates a second-level section; -
====indicates a third-level subsection; -
and so on.
-
= Document title

== Section 1

=== Section 1.1

==== Section 1.1.1

===== Section 1.1.1.1

== Section 2

=== Section 2.1

...
Section types
Automatic type recognition
Metanorma automatically detects these standard section types when their titles match common patterns in any supported language:
-
Abstract
-
Foreword
-
Introduction
-
Acknowledgements
-
Executive summary
-
Scope
-
Normative references
-
Terms and definitions
-
Symbols and abbreviated terms (or individual Symbols/Abbreviated terms sections)
-
Bibliography
-
metanorma-extension(special container section)
The content body, or annexes, are entered as normal sections without need for pre-defined titles.
Fixed section names are specific to either the preface of a document, or the main body; so for example an instance of "Introduction" the main body of the text will not be treated as part of the preface.
|
Note
|
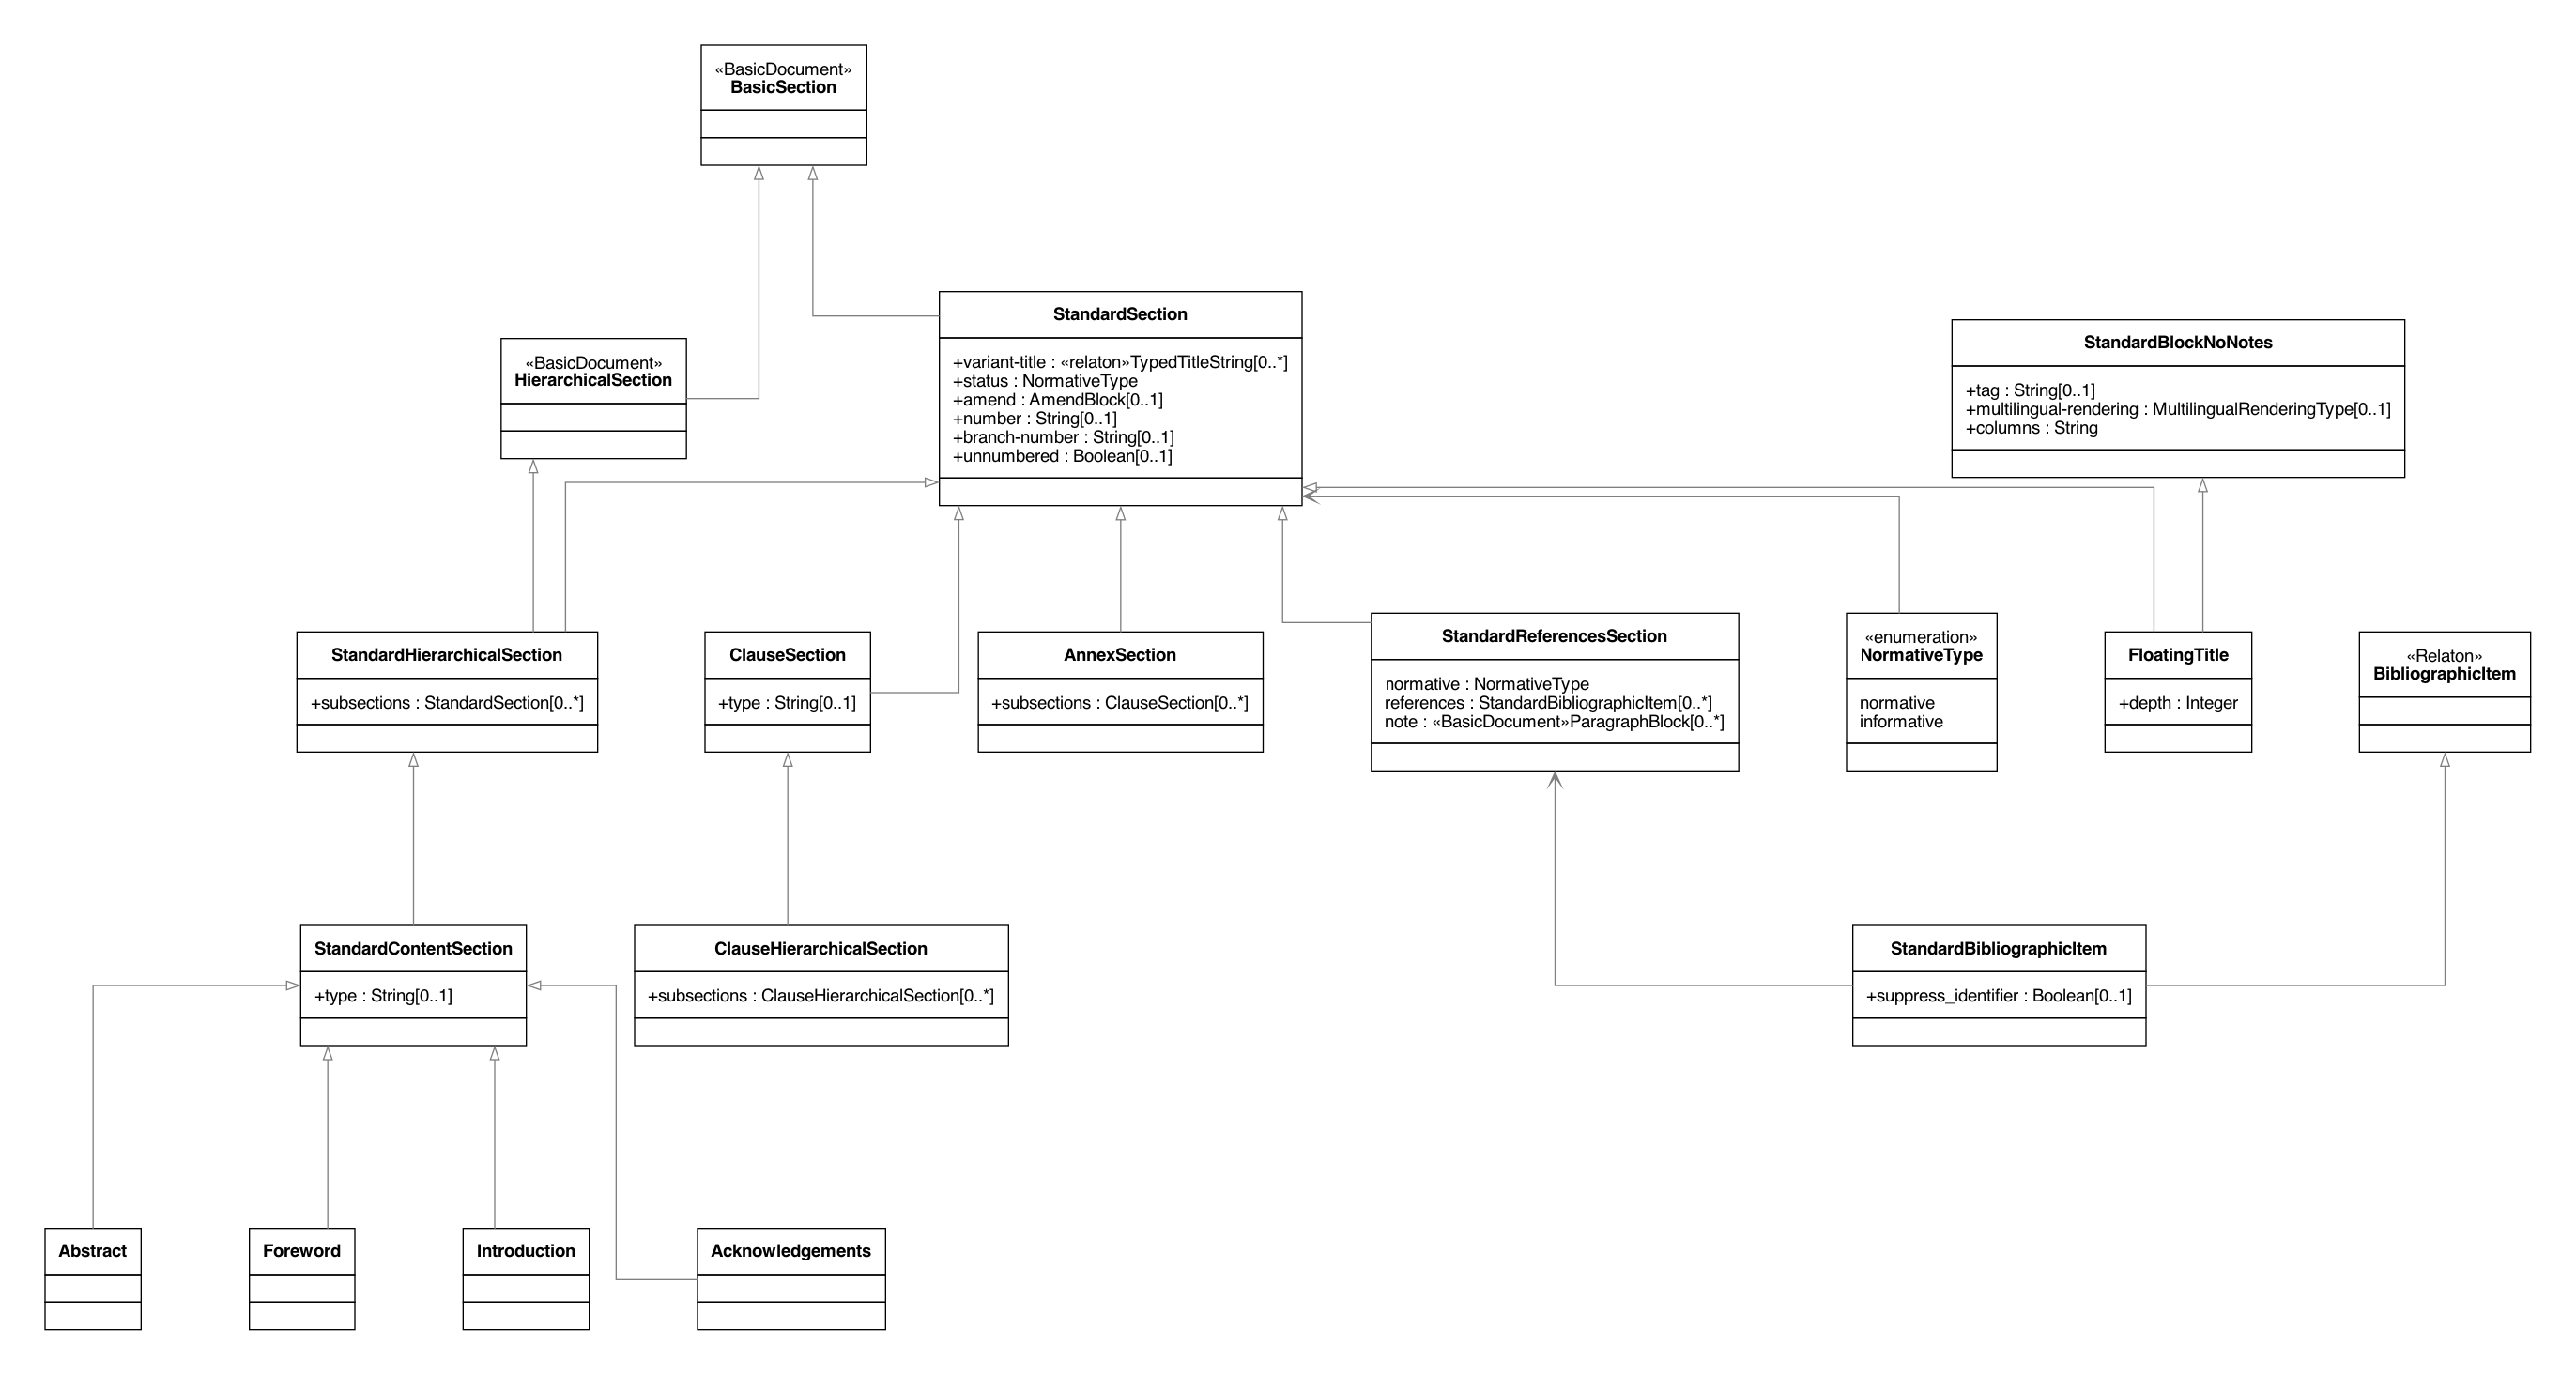
The underlying document model behind all Metanorma flavors is called the StandardDocument model, also abbreviated as "StanDoc". The available section types available in StanDoc are reproduced in this section. StanDoc represents the harmonized common requirements of standardization documents, not the document model of a particular SDO. |
Flavours may overrule these pre-defined section titles with titles of their own, or may choose not to recognise at least some of them as special sections.
|
Note
|
Each organization is based on the standard document model but they can omit sections or make them mandatory, if they choose to. For example, only NIST uses the acknowledgments section, whereas other SDOs do not require it. Flavours may overrule these pre-defined section titles with titles of their own, or may choose not to recognise at least some of them as special sections. Check the flavor documentation for more details on how your SDO uses Metanorma. |
Manual type specification
If the section title does not match standardized title patterns, the section type must be explicitly declared using attributes.
|
Note
|
Clause titles can differ from standardized titles for custom phrasing or language differences. |
[type_attribute]
== Your Custom Title
Supported section type declarations include the following.
| Section type | Standardized title | Declaration |
|---|---|---|
Metanorma Extension |
"Metanorma-Extension" |
|
Abstract |
"Abstract" |
|
Foreword |
"Foreword" |
|
Preface |
No standardized title |
|
Introduction |
"Introduction" |
|
Acknowledgments |
"Acknowledgements" |
|
Executive summary [added in https://github.com/metanorma/metanorma-standoc/releases/tag/v3.0.7] |
"Executive summary" |
|
Scope |
"Scope" |
|
Bibliography |
"Bibliography" or "Normative references" |
|
Terms and definitions |
"Terms and definitions" |
|
Symbols and abbreviated terms |
"Symbols", "Abbreviated terms", "Symbols and abbreviated terms" |
|
Index |
"Index" |
|
Appendix |
No standardized title |
|
There are some restrictions on the number of sections of certain types that can be included in a document.
For all documents:
-
only one "Abstract" section is allowed
-
only one "Acknowledgements" section is allowed
-
only one "Executive summary" section is allowed
-
only one "Index" section is allowed
In most flavours and document types:
-
only one "Terms and definitions" section is allowed
For sections that are limited to one instance, if a second matching clause is found, it is treated as a normal clause.
This behavior can be overridden by specifying the section type in a heading
attribute: this is interpreted as the user explicitly wanting that section type
to apply [added in https://github.com/metanorma/metanorma-standoc/releases/tag/v2.10.0].
Setting heading=clause will suffice to ensure that a clause is treated as a normal clause.
The following example indicates usage of the section titles.
= Document title

== Abstract

== Foreword

[preface] (1)
== Introduction to version 3 of this standard

[bibliography] (2)
== Normative references

[heading=terms and definitions] (3)
== Terms, definitions, and abbreviations

[bibliography]
== Bibliography
...

[appendix,obligation=informative] (4)
== Additional content
...-
This section is meant to be the introduction but the title deviates from the pre-defined title. The
[preface]declares it as such. -
"Normative references" is encoded with the
[bibliography]declaration. -
The "heading" declaration assigns the section as a particular kind.
-
"Additional content" is an annex and needs to be declared explicitly. Normative status of the annex is defined by adding the
obligationoption.
Look at the prepopulated Metanorma document. There are many clauses describing the content but there are sections missing to form a correct standard document.
Add the following sections:
-
Foreword on line 13
-
Introduction on line 21
-
Terms and definitions on line 27
-
Bibliography on line 60
We’ve built the basic structure of a Metanorma document. Let’s add some content to our document in the next lesson.
>> Start next lesson
Blocks
Information that forms a logical segment, such as a paragraph or a list, is called a block. Most blocks start and end with a delimiter which is a matching sequence of characters. The delimiters tell the compiler that the text they contain belongs together.
I'm a paragraph and I don't need a block delimiter.
(1)
. I'm a list item and also do not need a delimiter
. I'm the second list item
. I'm list item number three

//// (2)
I'm a comment.
////

[source, python] (3)
----
print("Hello World!")
-----
Paragraphs and lists are types of blocks that do not need any delimiters. They are separated by a blank line in between blocks.
-
Comments use four slashes as a delimiter
////. No other block uses slashes to begin and end a block. -
All other types of blocks rely on delimiters, such as four dashes
----or four equal signs====. This block contains a code sample written in python.
There are many types of blocks in AsciiDoc, such as: * Paragraphs * Lists * Tables * Images * Admonitions (Note, Caution, Warning, etc.) * Examples * Code samples * Mathematic formulas * Term definitions * Comments * Reviewer Notes
Let’s look at lists in the next lesson.
>> Start next lesson
Lists
Metanorma AsciiDoc supports three types of lists:
-
Unordered lists
-
Ordered lists
-
Definition lists
Unordered lists
Unordered lists are bulleted lists, entered using the asterisk (*) symbol.
Unordered lists can be nested by prefixing additional asterisks.
The main changes compared to the previous edition are:

* updated normative references;
* deletions:
** deletion of 4.3. [nested list item]
** deletion of 4.4. [nested list item]
Ordered lists
Ordered lists are invoked by beginning the line with a dot .. The list items
are numbered automatically. The default list uses arabic numbers, but can vary
depending on the defined style of the Metanorma flavor.
. First Step
. Second Step
. Third Step
Definition lists
Definition lists pair a term and a description together in a list, separated by
two or more colon symbols (:).
Definition lists are often used to define abbreviations, units or symbols.
|
Note
|
In Metanorma, the Terms section uses a special syntax for defining terms. |
|
Note
|
Definition lists are also sometimes called description lists. |
Definition lists follow the syntax of:
`term:: Definition`
stem:[w]:: is the mass fraction of grains with a particular defect in the test sample;
stem:[m_D]:: is the mass, in grams, of grains with that defect;
stem:[m_S]:: is the mass, in grams, of the test sample.|
Note
|
stem:[] is used for mathematical formatting, and results in italics. So
stem:[w] is an italic w, w; stem:[m_D] is an italic m with a D subscript:
mD.
|
Add lists to the prepopulated document.
-
Add an ordered list in lines 17-24.
-
Add an unordered list in lines 36-40.
-
Add a definition list in lines 46-48.
Hint
Ordered list items start with a dot, followed by a blank: . List item.
Unordered list items start with an asterisk, followed by a blank: * List item.
To write a definition list, follow the syntax:
term:: Definition
Great work! Let’s have a look at term definitions in the next lesson.
>> Start next lesson
Term definitions
If you want to cite a term throughout the standard, include it in the terms and definitions section. Term definitions vary from definition lists, as they are more granular and provide metadata to mark features such as alternative terms or deprecated terms. Let’s have a look at a term entry:
== Terms and definitions (1)

=== husked rice (2)
deprecated:[cargo rice] (3)

Paddy from which the husk only has been removed. (4)

[.source] (5)
<<ISO7301,clause 3.2>>, The term "cargo rice" is shown as deprecated, and Note 1 to entry is not included here

=== milled rice
alt:[white rice] (6)

term:[husked rice] from which almost all of the bran and embryo have been removed by milling. (7)

=== extraneous matter
alt:[EM]
domain:[rice] (8)

organic and inorganic components other than whole or broken kernels

[example] (9)
Foreign seeds, husks, bran, sand, dust.-
The start of the terms and definitions section
-
The term that should be defined is marked as a subheading using three equal signs.
===. -
The term
husked ricesupersedescargo rice. To document the old term, use the annotationdeprecated:[term]. -
Definition for the term: the first paragraph of text after macros like
deprecated:[]andalt:[]. -
The
[.source]attribute indicates that a citation follows, indicating where the term definition has been taken from. Make sure to include the dot.before source, so that the citation will be rendered correctly. -
alt:[white rice]indicates the alternative term for milled rice. -
term:[husked rice]cites the previously introduced term. -
Terms that do not obviously belong to a certain domain can be annotated with
domain:[]at the start of their definition. -
If you provide an example, use the
[example]attribute so that it renders according to the styling rules of your SDO.
Create a term definition entry for the term "immature kernel":
-
Add an alternative term ("unripe kernel")
-
Add a deprecated term ("raw kernel")
-
Add a definition: kernel, whole or broken, which is unripe and/or underdeveloped.
Hint
The structure for a term definition looks like this:
=== Term
alt:[alternative term]
deprecated:[deprecated term]

definition
The next type of block we will cover are tables.
>> Start next lesson
Tables
Metanorma AsciiDoc supports all basic table syntaxes of AsciiDoc, including:
-
cells spanning multiple rows and columns;
-
horizontal alignment;
-
vertical alignment [added in https://github.com/metanorma/metanorma-standoc/releases/tag/v1.5.3].
Given AsciiDoc is a plain-text format, it uses specific symbols to determine where new table rows and columns begin.
[cols="1,1"] (1)
.A table with a title (2)
|=== (3)
|Cell in column 1, header row |Cell in column 2, header row (4)

|Cell in column 1, row 2
|Cell in column 2, row 2 (5)
|=== (6)-
Optional table attributes that specifies the table structure. The numbers specify the relative amount of spacing between the columns.
cols="x,x"indicates that there are two columns. -
The table title can be assigned by beginning a line with a dot
.. Make sure that there is no space between the dot and the first word of the heading. -
Starting table delimiter
|=== -
Header row. The line immediately after the starting delimiter is the header row. To add a column, add a vertical bar
|before the text that should be in the column. -
When using the
[cols]attribute, columns in the same row can appear on different lines of AsciiDoc text. Otherwise, they need to all be on the same line of text, like in <4>. -
Closing table delimiter
|===
Let’s compare rice against wheat in a table:
-
Create an empty three column table with seven rows.
-
Add a table title: "Nutrient profile of rice vs. wheat"
-
Let’s make the first column a bit wider than the other two columns in the ratio 3:2:2 by using the
colsattribute. -
Populate the table like this:
Nutrient |
Rice |
Wheat |
Energy (kJ) |
1736 |
1574 |
Protein (g) |
8.1 |
14.5 |
Fat (g) |
0.8 |
1.8 |
Carbohydrates (g) |
91 |
82 |
Fiber (g) |
1.5 |
14 |
Sugar (g) |
0.1 |
0.5 |
Hint
The structure for a three column table looks like this:
|===
|||
|||
|||
|===
Let’s look at inserting images next.
>> Start next lesson
Images
A block image is displayed as a discrete element, i.e., on its own line, in a document.
The syntax used to enter a block image is as follows.
The image:: line is preceded by a blank line, entered on a line by itself,
and then followed by a blank line.
image::{PATH}[]Where PATH is the image path.
In Metanorma, block images are always entered as a figure. Please refer to the documentation on Figures.
[[my-anchor]] (1)
.Title for image (2)
image::images/path.png[Alt text] (3)-
Optional anchor for referencing
-
Image title
-
Image command with path and optional alt text. If no alt text is provided, leave the square brackets at the end empty (
image::path[]).
Insert an image of a rice plant in line 17 by following the steps below:
-
Add an image macro.
-
Populate the
image::macro with this link:
https://upload.wikimedia.org/wikipedia/commons/2/27/Oryza_sativa_-_K%C3%B6hler%E2%80%93s_Medizinal-Pflanzen-232.jpg
-
Add a picture title (Oryza sativa)
-
Create a key with three entries
A:: Rice - A flowering specimen of the variety _melanoceras_ Alef.
B:: blossom panicle
C:: crop panicle
Hint
The syntax for images is: image::URL[].
Make sure to include the square brackets after the link.
Let’s look at admonitions next.
>> Start next lesson
Admonitions
General
Admonition blocks are typically inserted into the main content of a document providing guidance or request readers to exercise caution.
Types of admonitions
Metanorma supports the following admonition types:
- NOTE
-
Informative guidance.
- TIP
-
Useful information.
- EDITOR
-
Editor’s notes that will appear in a draft document.
- IMPORTANT
-
Important information on the application of the document.
- WARNING
-
Information that includes safety concerns.
- CAUTION
-
Information that the reader must be aware.
- TODO
-
Author’s or editor’s internal notes, not rendered.
The following types of admonitions require an atypical syntax for access:
- DANGER
-
Information that can lead to safety concerns if not covered.
- SAFETY PRECAUTION
-
Information that relates to safety precautions.
|
Note
|
Typical AsciiDoc only supports NOTE, TIP, IMPORTANT, CAUTION and WARNING. |
In addition, the following types are recognised by specifying [type=…] as a
block attribute on one of the latter four built-in admonition types in block
mode (other than NOTE):
-
statement: typographically separate statements in mathematics, such as propositions, proofs, or theorems. -
editorial: annotation by document editors, intended for all readers of the document and not just its authors. -
box: box element, intended as standalone sidebar which can be referenced from within the document.
[TIP,type=box]
====
This is a box
====
Other types can also be entered.
Specifying admonitions
There are two ways to declare an admonition: in a single paragraph and as a block.
Single paragraph admonitions
Start a new line with the admonition type in all caps and a colon and write your admonition.
NOTE: Advice on when to use which admonition type is specified in ANSI Z535.6.|
Warning
|
Single paragraph admonitions are only guaranteed to be recognised if they are natively supported by AsciiDoc: NOTE, TIP, IMPORTANT, CAUTION and WARNING. DANGER and SAFETY PRECAUTION are not recognised as single paragraph admonitions. EDITOR and TODO are recognised, but only as paragraphs directly under a section header: AsciiDoc limitations mean that they will not be recognised in other contexts, e.g. within table cells. |
Block admonitions
The syntax for a block admonition is as follows.
[NOTE] (1)
==== (2)
Content of the admonition block. (3)

Unlike an admonition paragraph, it may contain any AsciiDoc content.
==== (4)-
Admonition type in all caps enclosed in square brackets
-
Block start delimiter with 4
=signs. -
Multi-paragraph admonition content.
-
Block end delimiter with 4
=signs.
== General requirements

[NOTE]
====
This is just a note providing guidance.
====

[IMPORTANT]
====
This is an important message.
====

== Safety requirements

[WARNING]
====
This important notice applies to safety concerns.
====

[CAUTION]
====
This notice must not be ignored.
====
Turn the existing text into admonitions:
-
Turn the text in line 15 into an
IMPORTANTadmonition. -
Turn the text in lines 17-19 into a
WARNINGadmonition. -
Turn the text in line 21 into a
NOTEadmonition.
Hint
To create admonitions that span several lines, you need to declare a block.
[NOTE]
====
This is a long note.
It contains three lines.
Line three.
====
Great progress so far! Let’s look at code samples in the next lesson.
>> Start next lesson
Code Samples
There are some code samples in the document but they are not neatly packed into source blocks, so they cause trouble.
-
Create a source block with the attribute
rubyfor the code in lines 14-29. -
Create a source block with the attribute
pythonfor the code in line 32 -
Create a source block with the attribute
javafor the code in lines 35-39.
Hint
Source code blocks look like this:
[source,language]
----
Code
----
We’re done with blocks - good job! The next lesson covers inline markup.
>> Start next lesson
Inline Markup
To annotate single words, you use inline markup. The markup encloses the word(s) and you do not need to begin a new line. Inline markup allows you to:
-
Emphasize text
-
Link to external resources with hyperlinks
-
Create internal cross-references
-
Create index entries
-
Create Bibliographic entries
Let’s look at these features in the following lessons.
>> Start next lesson
Text markup
Metanorma supports extensive inline formatting functionality. The following formatting macros are available in Metanorma.
Basic markup
General
AsciiDoc allows you to:
-
Emphasize words in bold using asterisks
-
Italicise words with underscores
-
Apply
monospaceformat using backticks -
Specify superscript and subscript characters (CO2, x4)
*bold*
_italic_
`monospace`
^superscript^
~subscript~
Renders as:
bold
italic
monospace
superscript
subscript
Strikethrough
The strike command renders text with a middle line strikethrough.
The syntax is as follows:
[strike]#text#Where:
-
textis the text to be rendered with the strikethrough style
[strike]#strike through text#renders:

Small caps
The smallcap command renders text in small capital letters.
The syntax is as follows:
[smallcap]#text#Where:
-
textis the text to be rendered in small caps
[smallcap]#small caps text#renders:

Underline
The underline command renders text with an underline. [added in https://github.com/metanorma/metanorma-standoc/releases/tag/v1.7.2].
The syntax is as follows:
[underline]#text#Where:
-
textis the text to be underlined
[underline]#underline text#renders:

Ruby
Ruby annotations in East Asian text are provided [added in https://github.com/metanorma/metanorma-standoc/releases/tag/v2.7.5]
using the ruby:{annotation}[{base text}] macro.
The ruby command supports these optional parameters:
-
lang=for language of annotation -
script=for script of annotation -
type=for the type of annotation (pronunciationorannotation, withpronunciationas the default value).
ruby:とうきょう[東京]
ruby:とうきょう[lang=ja,script=Hira,type=pronunciation,東京]
ruby:Tōkyō[type=pronunciation,script=Latn,東京]
ruby:ライバル[type=annotation,親友]
ruby:とう[東] ruby:きょう[京]
ruby:Tō[script=Latn,東]ruby:kyō[script=Latn,京]
Metanorma supports "double-sided" Ruby annotations, with annotations both above and below characters; these are marked up as nested Ruby annotation macros, with the deeper nested annotation assumed to be the annotation below the characters.
ruby:とう[ruby:tou[東\]] ruby:なん[ruby:nan[南\]] の方角
ruby:たつみ[ruby:とう[東\]{blank}ruby:なん[南\]]
ruby:プロテゴ[ruby:まも[護\]{blank}れ]!
ruby:プロテゴ[れ{blank}ruby:まも[護\]]!
As of this writing, double-sided annotations are not supported in Word, and the nested annotations are realised as bracketed text.
Capitalisation
Capitalisation may be applied automatically in the rendering of documents, despite not being present in the source material; for example, titles and captions may be title-cased or put in all caps. In order to prevent a span of text automatically having its case changed, use CSS styling to set its CSS text-transform property to "none" [added in https://github.com/metanorma/isodoc/releases/tag/v2.8.5]:
:title: [css text-transform:none]#IoT# and content standards

...

=== Approaches to [css text-transform:none]#IoT#
As shown, such styling extends to document titles as document attributes.
Custom character sets
When a private use codepoint is used in a document, reflecting an agreement between the document author and the document renderer, but not a standard like Unicode, the custom character set that includes that codepoint needs to be flagged. So U+F8D0 is the Klingon letter for "a" in the Conscript Unicode Registry, but the Kanji-Katakana hybrid of 訁and コ (equivalent to 講) in the BabelStone PUA.
In order to flag such a custom interpretation of the codepoint, the interpretation can be named
in a formatting directive, flagged as custom-charset [added in https://github.com/metanorma/metanorma-standoc/releases/tag/v2.6.3].
For example:
[custom-charset:conscript]#\\uf8d0#
[custom-charset:babelstone]#\\uf8d0#
In order to be rendered, a font implementing that interpretation needs to be indicated as a processing hint
for Metanorma. This is done with the Presentation XML metadata directive
:presentation-metadata-custom-charset-font: {name of interpretation}:"{name of font}", as a document attribute,
giving a comma-delimited list of charset-font pairs. For instance:
:presentation-metadata-custom-charset-font: conscript:"Code 2000",babelstone:"BabelStone PUA"
:fonts: "Code 2000";"BabelStone PUA"
As with CSS declarations,
any font specified as a custom charset font also needs to be passed to Metanorma
in the :fonts: document attribute.
For a more deep explanation about encoding custom characters, see Encoding and rendering special characters in Metanorma.
Numeric ranges
Numeric ranges, like dates (e.g., 1981–1995), make use of en dashes in between the numbers, usually without any white space around.
At the time writing, there is no AsciiDoc encoding to render en dashes.
In Metanorma, there is a vision of implementing a semantic encoding for
numeric ranges, perhaps an option like range:[n,m] or shorthands like n..m.
For the time being, the existent workaround for such cases is the use of entity codes, more specifically:
&‌ndash;See chapters 15–17...
Issues 18–20 are in fact a single issue...
_Laser Physics_ *17* 1017–1024 (2007).renders:
See chapters 15–17…
Issues 18–20 are in fact a single issue…
Laser Physics 17 1017–1024 (2007).
Character substitutions
Metanorma AsciiDoc supports Asciidoctor-style character substitutions as shown in Supported Metanorma AsciiDoc character substitutions.
Metanorma AsciiDoc also recognises HTML and XML character references, and decimal and hexadecimal Unicode code points.
| Source | Rendered as | Note |
|---|---|---|
(C) |
© (Unicode 'Copyright Sign' |
|
(R) |
® (Unicode 'Registered Sign' |
|
(TM) |
™ (Unicode 'Trade Mark Sign' |
|
|
— (Unicode 'Em Dash' |
See NOTE below. |
... |
|
|
-> |
→ (Unicode 'Rightwards Arrow' |
|
=> |
⇒ (Unicode 'Rightwards Double Arrow' |
|
<- |
← (Unicode 'Leftwards Arrow' |
|
<= |
⇐ (Unicode 'Leftwards Double Arrow' |
|
|
Smart single quote, smart apostrophe |
|
|
Smart double quote |
|
Note
|
Replacement of - only occurs when placed between two word
characters, between a word character and a line boundary, or flanked
by spaces. Flanking spaces (as in x — y) are rendered as thin
spaces (Unicode 'Thin Space' U+2009).
|
In addition to these character substitutions, Metanorma converts straight quotes to smart quotes in postprocesssing: see ink:/author/ref/document-attributes#smart-quotes[Smart quotes] for the associated rules.
Footnotes
Footnotes are useful for adding remarks to content without distracting from the reading flow.
Metanorma AsciiDoc supports:
-
inline footnotes
-
multi-paragraph footnotes
|
Note
|
Typical AsciiDoc does not support multi-paragraph footnotes. |
Inline footnotes
Footnotes are added to a document using the footnote command (footnote:[]).
The syntax is demonstrated as:
Oryza sativafootnote:[Sativa means "cultivated"], is rice that is farmed commercially.Multi-paragraph footnotes
The multi-paragraph footnote command footnoteblock:[id] allows for
specification of multi-paragraph content within a
footnote, through a named note block. [added in https://github.com/metanorma/metanorma-standoc/releases/tag/v1.6.4].
The id is the identifier of a note containing the contents of the footnote.
The following syntax is used:
... footnoteblock:[my-anchor] ... (1)

...
[[my-anchor]] (2)
[NOTE] (3)
--
Multi-paragraph footnote content.
---
my-anchorindicates where the footnote’s text block is located. -
Anchor of the multi-paragraph NOTE block.
-
Defined NOTE block that provides content for the footnote.
This is a paragraph.footnoteblock:[id1] This continues the paragraph.

[[id]]
[NOTE]
--
This is

a multi-paragraph

footnote
--|
Note
|
Multi-paragraph footnotes are a Metanorma AsciiDoc feature and not supported in typical AsciiDoc. |
Format the text using the following formatting:
-
Add underline formatting to "Earth institute" in line 18
-
Add bold formatting to "from Africa, for Africa" in line 20
-
Add italic formatting to The New York times and International Herald Tribune in line 21
-
Add smallcaps formatting to all instances of "NERICA"
-
Add a footnote on line 22 explaining the term "perennial". Footnote text: A perennial plant lives more than two years.
Let’s look at a more advanced form of inline formatting: index entries
>> Start next lesson
Index Terms
Before you define an index term, your document needs a section where the index
terms can appear. To create an index, define a level 1 section (==) marked with
the style index at the end of your document.
[index]
== Index
Index entries can consist of up to three levels using a comma to separate the terms.
Metanorma provides two options to create an index entry:
-
Visible index terms are words within the text that are annotated with an index entry using double parentheses.
((Level 1 index term)) -
Hidden index terms are index entries that are not visible in the final output and are generated using triple parentheses.
(((Level 1 index term, Level 2 index term, Level 3 index term))). These allow the index to include optional subterms and sub-subterms; they also allow the index term to differ from what actually appears in the text.
Let’s have a look at an example:
The Lady of the Lake, her arm clad in the purest shimmering samite,
held aloft Excalibur from the bosom of the water,
signifying by divine providence that I, ((Arthur)), (1)
was to carry Excalibur (((Sword, Broadsword, Excalibur))). (2)-
((Arthur))will be displayed asArthurin the text and carries a first level index entry -
(((Sword, Broadsword, Excalibur)))will not appear in the text, but a three level index entry will be generated.
Let’s add some index entries to the text.
-
Add a visible index entry to "UN Millennium Development project" in line 17
-
Add an invisible three level index entry after NERICA in line 21: NERICA, economy, Green revolution
-
Add an invisible two level index entry in line 22 after rice: rice, perennial
-
Create a new index section at the bottom of the document
Hint
Visible index terms: ((Level 1 index term))
Hidden index terms: (((Level 1 index term, Level 2 index term, Level 3 index term)))
In the next lesson, we will cover references and links.
>> Start next lesson
References
References are an integral part of standards. The main mechanism for references are anchors and destinations. There are four types of references:
-
Hyperlinks to an external source, for example a link to a website
-
Metadata references
-
Internal references to a section, image, table, etc.
Hyperlinks
Metanorma AsciiDoc lets you include links to external sources, and sources to files within the same project.
To reference an internal source:
-
Use the
link:command to include a link to a file. The syntax looks like this:link:PATH[]. -
Add link text in square brackets after the path.
Example of an internal linkDownload the latest link:downloads/report.pdf[Report]!
To reference an external source:
-
Paste the URL into the document.
-
Add link text in square brackets after the URL (optional)
URL[Link text].Example of an external linkhttp://www.iso.org/[International Organization for Standardization].== Metadata references
Every document contains a set of metadata to describe the document. You can insert a metadata reference by putting the attribute in curly braces {attribute}. The reference will be replaced with the value in the rendered output.
:technical-committee-number: 2
:technical-committee: Fasteners
:subcommittee-number: 11
:subcommittee: Fasteners with metric external thread

This document was prepared by Technical Committee ISO/TC {technical-committee-number}, _{technical-committee}_, Subcommittee SC {subcommittee-number}, _{subcommittee}_.
Internal references
To link to an important section, table, figure, formula, or list item in your document:
-
Set an anchor using double square brackets before the content you want to reference:
[[anchor]].Example for an anchor preceding an image[[figureC-1]] .Typical gelatinization curve image::images/rice_image2.png[Image of the gelatinization curve] Figure 6. Rendered image caption
 -
To reference an anchor, type the anchor name like this
<<anchor>>.<<figureC-1>> gives an example of a typical gelatinization curve. Figure 7. Rendered reference
 -
To set an alternative text other than the anchor text, append the text inside the brackets using a comma.
<<figureC-1, The diagram>> gives an example of a typical gelatinization curve.
Auto-numbering of references
Metanorma automatically numbers and names references; because they are autonumbered, they will be renumbered automatically if you insert any new text of the same type.
Since the markup will be converted into XML, the anchor must follow the XML namespace conventions.
Therefore, an anchor name name must not contain:
-
colons
-
whitespaces
-
words starting with numbers
If you want to learn more about the technical aspects of cross-references, read Deep-dive into cross-references.
Format-independent links
Typical links created by the link command require the correct file path that
includes the file suffix (e.g. .html for HTML documents).
When linking a Metanorma document to another Metanorma document, which can be
rendered into multiple output formats with different suffixes
(such as in HTML, PDF or DOC), the option update-type=true can be specified
to achieve format-independent
links [added in https://github.com/metanorma/metanorma-standoc/releases/tag/v1.9.4].
When the option update-type=true is given, the rendered link will provide the
correct file paths dependent on the output format.
The following conditions must be satisfied to use format-independent links:
-
The link shall be relative and not absolute
-
The link shall not have a file suffix
link:../parent[update-type=true]
link:../child[This is the child document,update-type=true]
This will render the following links depending on the output format:
-
in HTML,
../parent.htmland../child.html -
in PDF,
../parent.pdfand../child.pdf
Hyperlink validation
Hyperlinks are validated and normalized in Metanorma [added in https://github.com/metanorma/metanorma-standoc/releases/tag/v2.5.2].
Hyperlinks are treated as IRIs (internationalized resource identifiers, where non-ASCII Unicode characters are allowed.)
As with normal AsciiDoc, http(s) links are assumed by default to be intended
as hyperlinks, and are marked up and rendered as such.
Example hyperlinks are often invalid (e.g. http://{domain}), and Metanorma
execution will be aborted if they are found, since they cannot be rendered as
meaningful hyperlinks.
Such links should be escaped by prefixing them with a backslash, which will
result in them being treated as plain text (e.g. http://{domain}.)
Bibliographic entries
Most standard documents contain two sections with bibliographic references, namely the "normative references" and the "bibliography" (informative references).
Every bibliographic section must be preceded by the style attribute
[bibliography] so that bibliographic references are recognized as such.
Entering a bibliographic entry
To enter a reference entry:
-
Start a new unordered list (
*) item. -
Enter triple square brackets (
[[[]]]) which contain:-
The anchor name used to reference this entry
-
A document identifier
Syntax for a bibliographic entry* [[[anchor,document identifier or reference tag]]], _reference list text_ -
-
After the triple brackets, you may include the reference text in italics, for example the title of the document.
NoteMetanorma uses Relaton to automatically fetch resource descriptions from SDO sources. If Metanorma recognizes a document identifier, it will overwrite any title you provide with the authoritative title of the reference.
Referencing a bibliographic entry
To cite an entry from your bibliography:app-name:
-
Enter the anchor name like this:
<<ISO20483>>. -
To specify a location within the cited document, you can add localities in the brackets like so:
<<ISO20483, part=IV,chapter=3,paragraph=12>>.
Bibliography example
The following code sample illustrates how a bibliography section looks like in AsciiDoc Metanorma.
[bibliography]
== Normative references

* [[[ISO20483,ISO 20483:2013]]], _Cereals and cereal products -- Determination of moisture content -- Reference method_
* [[[ISO6540,ISO 6540:1980]]]. _Maize -- Determination of moisture content (on milled grains and on whole grains)_
Gets rendered as:
-
ISO 20483:2013. Cereals and cereal products — Determination of moisture content — Reference method
-
ISO 6540:1980. Maize — Determination of moisture content (on milled grains and on whole grains)
Let’s add some references to the sample document.
Internal references:
-
Create an anchor for the table called
table1 -
Reference the table in lines 30 and 36.
Bibliographic references: The text references some standards which don’t have a matching entry in the bibliography section. Add the following references:
-
ISO712, ISO712:2009, Cereals and cereal products — Determination of moisture content — Reference method
-
ISO7301, ISO 7301:2011, Rice — Specification
-
IEC61010-2, IEC 61010-2:1998, Safety requirements for electric equipment for measurement, control, and laboratory use — Part 2: Particular requirements for laboratory equipment for the heating of material
Hint
Setting an anchor: [[anchor]]
Referencing an anchor: <<anchor>>
Let’s summarize what we’ve learnt so far.
>> Start next lesson
Summary
We’ve covered a lot of ground, so here is a quick summary for you:
-
Each Metanorma document contains metadata in the header using the colon notation
:attribute:. -
A Metanorma document consists of several predefined sections. The document model of your organization dictates which are optional and which are mandatory. Sections are invoked using equal signs
=. -
Blocks are entities that belong together, such as paragraphs, lists, tables, etc. Paragraphs and lists do not need to be marked by delimiters. The remaining block types begin and end with a delimiter, for example four dashes
----. -
Inline markup is used for text formatting and references. You can reference:
-
an external source (
URL[Link text]) -
Metadata (
{attribute}) -
Places in the document by setting an anchor (
) and referencing the anchor ([anchor-id]) -
Bibliographic entries
-
* [[[anchor,document identifier or reference tag]]], _reference list text_
<<anchor>>
You did a great job so far! Let’s talk about reviewing documents in the next lesson.
>> Start next lesson
Reviewing Metanorma Documents
Reviewing documents is an integral part of developing a standard. The best way to review a document, is to use a version control environment that supports comments as well, such as GitHub and its feature GitHub discussions. In case your organization does not use a git-based approach, Metanorma provides a comment functionality that lets you insert your remarks and create to dos. In this lesson, you will learn:
-
How to add comments using AsciiDoc markup
-
How to generate a draft using the command line.
>> Start next lesson
Adding Comments
layout: author-docs title: Reviewing documents ---
You can annotate a Metanorma AsciiDoc document with comments and `TODO`s to indicate a pending action.
Reviewer comments
To create a comment:
-
Define the start of the comment by creating an anchor
[[start]]. -
Define where the comment should end by creating an anchor
[[end]](optional). -
Add the comments metadata:
[reviewer="Your Name",date=YYYYMMDDT0000,from=start,to=end]
Thedateandtoattributes are optional. The timestamp in thedateattribute is optional, too. Thefromandtoelements can be bookmarks which cover no space. -
Begin the comment block using four asterisks
****. -
Enter your comment.
-
Close the comment block with four asterisks
****.
=== Address Profile Definition (AddressProfileDescription)

This is a clause address [[A]]proflie[[B]] definition

[reviewer="Nick Nicholas",date=20180125T0121,from=A,to=B]
****
proflie?!
****
which renders

By default, Metanorma will render annotations in output only if the document is unpublished, using SDO-specific criteria
to determine document status (the document stage). This can be overridden by setting :presentation-metadata-render-document-annotations:
to true or false.
TODO expressions
Metanorma treats TODO as an admonition label, and converts it into a reviewer note.
The from, to reviewer and date attributes are all treated as optional.
TODO: This is treated as a reviewer note.

[TODO]
====
This is also treated as a reviewer note
====
The text contains some typos. Mark the errors using comments.
-
Line 16: weter
-
Line 18: exseed
-
Line 20: eyes
Now that we’ve commented on the content, let’s create a draft of the document.
>> Start next lesson
Rendering a Draft Document
To render a draft that your peers should review, you need to add these metadata to the document header:
-
:draft:: Tells the compiler to display comments in the final output -
:status: draftDefines the current document stage.
NOTE: Some flavors, for example ISO, use:docstage:and a status code to indicate in what stage the document is.
To compile a Metanorma document you must enter the command metanorma and the document you want to compile document.adoc.
metanorma document.adocWith this command you trigger the Metanorma toolchain to:
-
Read the AsciiDoc input
-
Convert it into XML
-
Check the XML against the document model (XML schema)
-
Create HTML, PDF, and DOC output
Enter the command metanorma document.adoc into the terminal and see what happens.
Now that you are familiar with the simplest way of creating a Metanorma document, let’s look at different ways to compile documents in the next lesson.
>> Start next lesson
Publishing a Metanorma Document
Once you are happy with your document, the next step is to generate an output to send your SDO for publishing. Since Metanorma poses some validity criteria for your document, it is normal to face some errors. Don’t worry, we will go through some common errors and teach you how to resolve them. In this lesson you will learn:
-
How to generate PDF, HTML, and Word output using the command line
-
How to troubleshoot common errors
>> Start next lesson
Compiling a Metanorma Document
To successfully compile a Metanorma document, the toolchain looks at:
-
Metadata: The title, document flavor, and document type.
-
Syntax: Is the entered AsciiDoc code correct?
-
Dependencies: Are all tools needed to compile the document installed?
-
File references: Are any files referred to by the file being compiled, and is their path entered correctly, for example when you include images (
image::PATH[]). Advanced AsciiDoc usage also allows a document to embed other AsciiDoc documents (include::PATH[]), and Metanorma extends this in advanced usage to external data sources.
To compile a Metanorma document:
-
On the command line, go to the folder where the document you want to compile is located.
-
Enter the following command:
metanorma document.adoc
With this command you trigger the Metanorma toolchain to:
-
Read the AsciiDoc input
-
Convert it into XML
-
Check the XML against the document model (XML schema)
-
Create HTML, PDF, and DOC output
You can also manipulate the way Metanorma compiles a document by setting flags.
Flags are appended to the build command, like this:
metanorma document.adoc -x htmlYou can use the following flags to manipulate the building process:
-
-t: Sets the flavor of the document
NOTE: Either define the flavor in the metadata usingmn-document-classor use-t flavor -
-x: Sets the output format(s) of the document -
-o: Enter a path that the output should be saved to.
To see the full list of possible build commands, open the Metanorma help on the command line.
metanorma help compile>> Start next lesson
Troubleshooting
There can be many reasons why you can’t compile a Metanorma AsciiDoc document into the final output, but you can easily fix them when you are familiar with typical errors.
Metanorma tells you what’s wrong in the terminal while it is building the
document. The errors are also stored in an Error file .err in the same
directory where your original document is stored, so you can debug them later.
How to troubleshoot a document
Modular document setup
The best way to troubleshoot a document is to break up the content in several parts to narrow down the location of the error.
Regardless of troubleshooting, it is a good practice to divide a document into sections. You can then compile each section separately, or compile several of them in order to locate the error easier.
For example, if you assume there could be some error in Foreword section and want to exclude it from being rendered, you can easily comment out the section.
 Header with metadata...

 // include::sections/00-foreword.adoc[]

 include::sections/01-introduction.adoc[]
 include::sections/02-scope.adoc[]

 ...
Using the concatenated document for debugging
When you compile a Metanorma AsciiDoc document, Metanorma processes the document and all its included subdocuments, and concatenates them into a single document, which is then processed by the Metanorma AsciiDoc processor.
The preprocessing step is useful for debugging, as it allows you to see the concatenated document that Metanorma AsciiDoc sees, which is the document that is actually processed by the Metanorma AsciiDoc processor aligning with line numbers pronounced in the terminal output.
If a document consists of multiple included subdocuments, or contains Liquid templates which are resolved through the LutaML plugin, the line numbers expressed by Metanorma AsciiDoc processing will not correspond to the line numbers in the original source document, but rather to the line numbers in the concatenated document that Metanorma AsciiDoc sees.
To assist debugging, Metanorma generates a concatenated document after
preprocessing, including resolving all Liquid contexts and include directives,
into a debug file {filename}.asciidoc.log.txt, generated in the same directory
as the base source document
This feature was [added in https://github.com/metanorma/metanorma-standoc/releases/tag/v3.0.10].
Where to start troubleshooting?
-
If the document did not compile:
-
If Metanorma did not generate any visual output, you need to work with the errors in the terminal.
-
If execution has aborted before the XML content could be finalised, the XML file is still output to disk, suffixed with
.xml.abortrather than.xml, and you can use it to make sense of error messages.
-
-
If the document did compile and generated visual output:
-
Have a look at the compiled output: Are there missing sections? Is the formatting different than what you expected? Sometimes you can catch errors by looking at the rendered document. After that, have a look at the errors on the terminal to pinpoint where things went wrong.
-
Markup errors
Metanorma can’t compile a document when required information is missing or there are markup errors.
Header lacks required metadata
Metanorma can’t compile documents when the core metadata of a document are missing or incomplete. Metanorma will not render a document if one or more attributes are missing or contain unknown values:
-
Type of flavor
:mn-document-class:, for exampleiso,ietf,un, etc.If the document flavor isn’t specified in the header, it needs to be specified in the build command, or else the compilation will fail.
-
Document type
:doctype:, for exampleinternational standardIf the document type isn’t specified in the header, it needs to be specified in the build command, or else the compilation will fail.
-
Metadata specific to your organization. Check the flavor documentation to make sure you’ve entered the metadata correctly.
A single double quotation mark inside of a stem block
Double quotation marks are used in stem blocks to denote normal text, e.g.:
stem:["normal text"]
An odd number of double quotation marks inside a stem block will provoke a compilation error.
stem:["normal text""] leads to the following compilation error:
...
  from C:/tools/ruby25/lib/ruby/gems/2.5.0/gems/metanorma-cli-1.4.6/exe/metanorma:20:in `<top (required)>'
  from C:/tools/ruby25/lib/ruby/gems/2.5.0/bin/metanorma:23:in `load'
  from C:/tools/ruby25/lib/ruby/gems/2.5.0/bin/metanorma:23:in `<main>'
parsing: "normal text""
undefined method `[]' for nil:NilClass
An external file is not found
Metanorma can’t compile a document when a reference to an external file cannot be found (i.e., an image or any other type of file). The error message will be explicit on which file.
You can solve the problem by checking the specified location of the file.
Two or more cross-references have the same anchor
If two or more cross-references have the same anchor, the document won’t build and the error message will be clear on the reason.
[[anchor1]]
== Section 1
...

[[anchor1]]
== Section 2
...
To solve this problem, rename the anchor. Check your document against any references for the anchor that you changed and update them.
Rendering errors
The main cause for rendering errors are markup errors which can lead to unexpected rendering results.
Some issues can be:
Title page is missing information
If your title page is missing completely, or only shows parts, check the document attributes in the header. If metadata, like the title, is missing, the document will be rendered faulty.
Document starts to look odd from one point onwards
AsciiDoc requires block delimiters for some block types, such as code samples and tables. The block delimiter consists of a minimum of four characters. If the number or type of block delimiters don’t match, the compiler doesn’t know where a block begins/ends.
Look for the beginning of the issue, go to the markup, and check out the delimiting characters of the blocks.
[source,asciidoc]
=== (1)
image::../assets/image.png[]
===

|== (2)
|Name of Column 1
|Name of Column 2

|Cell in column 1, row 1
|Cell in column 2, row 1

|Cell in column 1, row 2
|Cell in column 2, row 2
|--- (3)-
The author wanted to demonstrate how to insert an image using AsciiDoc markup. However, the compiler will insert the image (if it exists) because of the missing
=. -
The block delimiter is only three characters long, so the compiler will not render the table.
-
|---This delimiter is invalid.
Paragraphs look like code blocks
If you ever see a paragraph rendered inside of a source block, you probably have left a white space at its beginning. Paragraphs cannot begin with any white space or they will be erroneously rendered as source blocks.
Missing images
If there are images missing, make sure that:
-
The syntax is correct. Make sure you set the square brackets at the end, even if you don’t want to use any attributes for the image.
image::path/file.jpg[] -
The path and the file extension are correct. If you used the
:imagesdir:attribute to set the image path, check if the path is correct.
The following document doesn’t compile because there are some errors.
-
Enter
metnanorma exercise-4.adocto trigger the build process -
Have a look at the error messages
-
Try to debug the document. If you get stuck, have a look at the hints.
-
Once you solved the errors, run
metanorma exercise-4.adocagain to see if the document compiles.
Hint Error 1
Lines 12 and 43: Both sections have the anchor [[prefatory-clause]] assigned.
You can solve this error by renaming the anchors.
Hint Error 2
Line 76: The file that should be included cannot be found. Since the scope section already contains text, you can delete the reference.
Hint Error 3
Line 420: The image attribute contains a whitespace after image::, so the path is invalid. Delete the whitespace.
>> Start next lesson
Summary
Let’s summarize what we’ve learnt in this lesson:
-
To generate a Metanorma document, enter the following command:
metanorma document.adoc
-
More often than not, we encounter errors that we need to fix:
-
Metadata errors: Provide all metadata that your organization mandates; include the flavor type and document type either in the header or in the build command.
-
Markup errors: Make sure you’ve entered the correct syntax for blocks or inline macros and provided the correct filenames and paths.
-
Reference errors: If a reference can’t be resolved, make sure that the anchor name follows the naming rules; The anchor and the reference need to be identical.
-
Bugs: Sometimes, when you can’t solve an error, you might have discovered a bug. Feel free to raise an issue in your organization’s repository on the Metanorma Github page.
-
Great work!
>> Finish the tutorial